
Information windows
Every symbol used in a Songworks composition has an information window that gives you access to special options that can affect the appearance or behavior of the symbol. For simple pieces you may never need to use these, but they offer a lot of extra power if you're looking for special effects. To see the information window for any symbol select the symbol and either press the button titled "Information for selected item," or press ctrl-i (Windows) or command-i (Macintosh).
The Note Information window
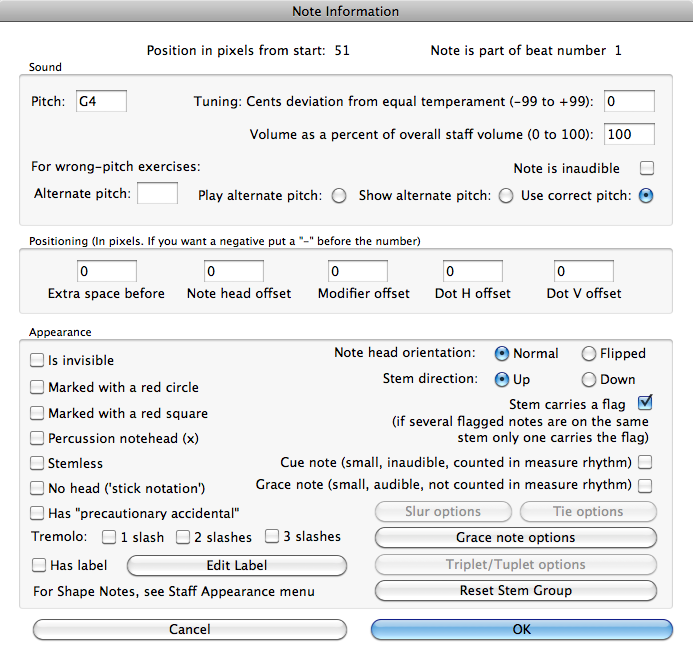
 This is the biggest of all the information windows, for there many possibilities for extra effects in a note symbol. Starting at the top:
 Position in pixels from the start
Reveals the distance in pixels (about 72 to the inch) of this item from the beginning of the music.
Note is part of beat number
Counting the first beat of the piece as "1," tells you which beat this note lies in.
Sound-related information
Pitch
Tells the pitch of this note. Pitches are identified by name and octave, with C4 being middle C. The number sign # is used for sharps, a lower-case b for flats; x for double-sharp and bb for double-flat. You can change the pitch manually in this window, but it's probably easier to change note pitches just by dragging the note in the staff, or by selecting it and choosing a sharp or flat symbol, etc.
Specified in cents plus or minus from the normal equal-tempered pitch. There are 100 cents in an equal-tempered semitone. The effect of this can only be heard if you computer supports microtonal tuning. Currently only Macintosh computers support microtonal tuning.
Listed as a percentage of the overall staff volume. The staff volume is in "MIDI volume" terms - MIDI volume ranges from 0 to 127. If a staff's volume has been set to 120 and a note is at 50%, then it would have a MIDI volume of 60. That allows you to change the staff volume without upsetting any special volume adjustments you've done for individual notes. Remember that MIDI volume is not really like volume on an amplifier: it's supposed to represent the speed at which a pianist's finger strikes a key - for some instrument sounds a very high MIDI volume produces a harsher tone.
Note is inaudible
Why would you ever want a note to be inaudible? It happens, especially if the note is just a 'cue' note drawn small.
These are useful only in very particular cases, when you are making something like a wrong-pitch exercise in a program like Practica Musica that uses files in the Songworks format. The normal thing, of course, is to sound the pitch correctly. But for these special purposes it is possible to make the note either play or display an alternate pitch.
Positioning
Extra space before
Does the same thing as the Spreader and Shrinker tools: puts a little extra space before a note, or reduces it. This is just for fine tuning, especially if you have lyrics and some syllables are too long for the notes they refer to.
Note head offset
Normally you don't need to change this; it's all automatic. But there could be some unusual chord in which you want more control over the exact position of the note head. "6" is the width of a note head, measured in pixels (all measurements are in normal sized notes, and the program automatically adjusts if you're actually printing a larger size).
Refers to the distance from the note head's start to the start of a flat or sharp. Once again this is normally automatically set by the program, but if you have some reason to make aa further change this is where you can do it.
Dot H offset, Dot V offset
THe horizontal and vertical offset from a note to its dot, if there is a dot. Once again, normally you don't need to do anything about this. But here you have the power to modify.
Appearance
See also the Staff Appearance options in the Staff menu for more variations on the appearance of notes in a staff, such as Shape Notes, or setting an entire staff to display percussion noteheads, etc.
Again you might ask: why would I ever want a note to be invisible? It can happen, especially when making an exercise of some sort.
Marked with a red circle, Marked with a red square
Draws a red circle or square around the note head.
Substitutes an "X" for the note head.
Stemless
Liturgical music in particular sometimes requires stemless notes.
Just the stems, please. Sometimes used in education.
A precautionary accidental is a sharp or flat or natural that really doesn't need to be there because it's already in the key signature or was introduced earlier in the measure, but you want it to appear anyway as a reminder to the reader. You can force a precautionary example by holding down the Option key (Alt on Windows) when entering the note or modifying an existing note, or you can do it the hard way by checking or unchecking this box.
Visual only. The program will play notes with tremolo slashes just as it would an ordinary note, but a reader would interpret them as quick repeated notes of the indicated pitch.
The checkbox tells you if the note has a text label; the button lets you edit or create one. Labels are very handy for purposes like fingering indications - a label can be dragged to a precious location relative to the note, and will copy with the note if you copy and paste the note. Labels can use any font/style/size, so that you can use them to put in special symbols found in, for example, a symbol font. Labels can also be attached to many other staff items - if the symbol can hold a label the label tool will appear in that symbol's information window.
Normal notes have the notehead to the left of a rising stem, or to the right of a descending stem. A flipped note head is sometimes necessary in certain chord combinations. Normally the program will take care of this for you.
Stem direction
It's easier to set stem direction by selecting a note or group of notes and clicking the UpStem or DownStem button. But this is another way to do it.
Cues are drawn in small size and are inaudible. In an orchestra part they just give some guidance to a reader, telling what another instrument is doing during a rest. Cue notes take up normal space in a measure and follow the usual notation rules, but just are not heard.
Graces are small notes that indicate some kind of decoration; they may be played before the note they precede, or at its time, but they are not counted in the rhythmic total for the measure.
These are disabled unless there is a slur or tie attached to the selected note. Currently the only option is to make the slur or tie draw as a dashed line rather than a normal solid line.
Grace note options
Lets you choose whether a grace will be played before the main note, or at its time.
Triplet/Tuplet options
You can adjust the appearance of a triplet or tuplet, or have it not be drawn at all.
If you've been adjusting a chord, or want the program to readjust one, this will reset the notes of a single stem so that they are positioned correctly. In some complex chords there may be choices on how to do this, and if you're particular you have the notehead offset, etc. to play with if needed.
The Rest Information window
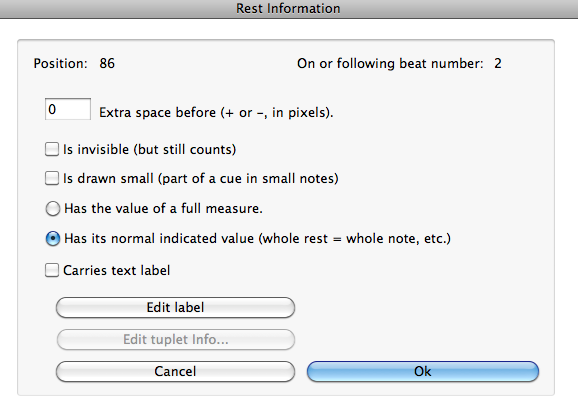
Extra space, invisible, cue, label and tuplet options
- are the same as for notes, above. But there are some new choices peculiar to rests:
Has its normal indicated value
Whole rests conventionally are counted with however many beats make a measure in the current tempo - so long as the whole rest is the only thing in the measure. Otherwise the whole rest would have a value like a whole note - equal to 4 quarter notes, 8 eighth notes, etc. You can choose which by using this option.
The Multiple Rest Information window
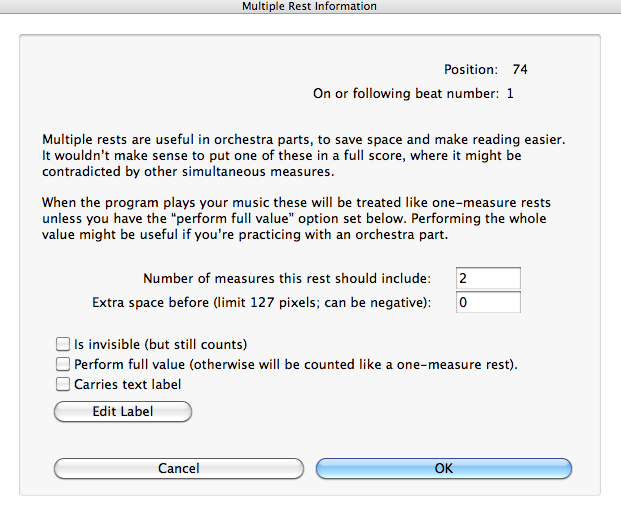
Multiple rests are used only in parts for a single player. They save page turns, and can make it easier to read a long part. A multiple rest looks like a long whole rest with vertical signs at each side, and can be chosen in the whole rest choice box. The info window for a multiple rest contains these special options:
Number of measures this rest should include
Must be an even number of whole measures.
Perform full value
Normally when you're using the computer to listen to a part you won't want to wait though multiple measures of rest. But if you do want to count it as you would when playing with other people, check this box.
The Barline Information window
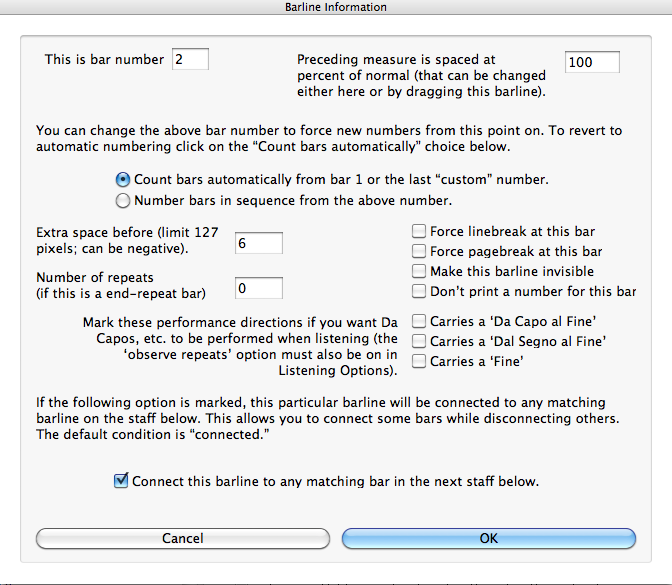
This is bar number
Measure numbers (bar numbers) can be displayed or not (see the Score Menu for numbering options). If you want to set a number to something specific you can do it here.
Preceding measure is spaced at [] percent of normal
Songworks allow you to use the arrow tool to drag barlines left or right, compressing or expanding the spacing of the items in the preceding measure. If a barline has been dragged this way you can see its size percentage here, or even alter it by changing the number.
Count bars automatically from bar 1 or the last 'custom' bar number.
This is the normal choice; the program will figure out the bar numbers itself. Or:
Number bars in sequence from the above bar number.
The alternative is to start with the number you've indicated above and go from there.
If this is a repeat bar the repeat would normally be taken once, but can increase the count if you have a lot of verses and want the music to play as performed.
Force line break, Force page break.
Normally you'll just let Songworks choose line breaks and page breaks on its own. But if you have some special reason to break at a certain barline you can do so.
Make this barline invisible.
Why? Because the program needs to have barlines here and there in order to be able to line things up nicely at the right side of the page. But if you don't want the barline to be seen, check this box.
Don't print a number for this bar.
Explains itself. Maybe a number would get in the way visually of some other element at this spot.
Carries a 'Da Capo Al Fine,' Carries a 'Dal Segno al Fine', Carries a 'Fine.'
If
you want the program to actually perform Da Capos, etc. that you've written into the score with the text tool it is necessary to tell it by checking one of these boxes for the relevent barline. Da Capo Al Fine means go the beginning (head, or capo) and continue until the Fine (indicated in the score). Dal Segno Al Fine is the same, but goes back to the segno sign instead of all the way to the beginning.
Usually all matching barlines would be connected. But sometimes a composer or editor connects some staves and not others (except at the left edge of the page, where all simultaneous staves are connected).
The Tempo Change Information Window

You can enter as many Tempo Change symbols as you want. It makes sense to put these only on the upper staff; they will affect the entire piece anyway. Tempo changes can happen at any even beat number (but not halfway through a beat). You'll find the Tempo Change symbol in the miscellaneous symbols popup.
For backward compatibility Songworks still supports absolute tempo, meaning that if you put in a tempo of 60 for a section of music that section will play at 60 even if the overall tempo gets changed to twice that. But for most purposes the second type, relative tempo change, is more useful. If you just want a section to be a little slower than the rest of the piece, set its relative tempo to less than 100%. Then it will still be slower no matter what happens to the overall tempo setting.
Tempo change is to be printed
You might want some changes to be heard but not seen when the music is printed. You'll see see them in the edit window.
The Symbol Information Window
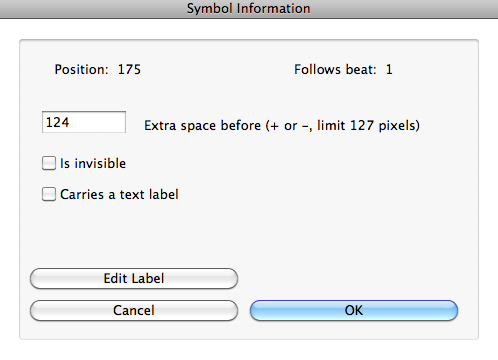
This window is for miscellaneous symbols. The options it contains are all covered in the discussion of the note information window.
The Chord Symbol Information Window
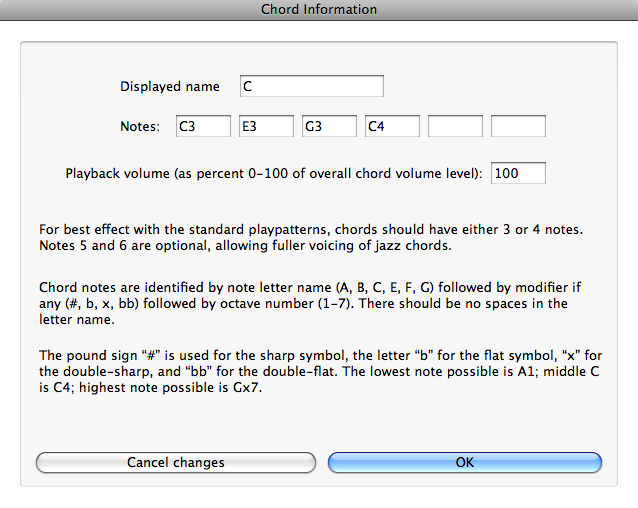
Chord symbols are normally entered and changed by choosing a standard chord from the choice choice boxes, or by modifying a selected chord with the "chord type" and "chord root" choice boxes. But you can gain further control over chords by bringing up the information window for a chord selected in the music or in the choice boxes. Here you can type in your own choice of chord name, and you can specify which pitches are contained in the chord.
Displayed name
Whatever is entered here will appear as the chord name, using the font chosen for chord symbols. The name will even transpose correctly when you transpose the score, if you follow the below naming convention for chords:
The first characters should identify the pitch class of the chord root, using b for a flat and # for a sharp, x for double sharp and bb for double-flat. For example, C, F#, Ab.
Following that should be the type of the chord. This can be anything you want, either with or without a preceding space. For example, Min, Dim, 7, etc.
If the chords are identified by Roman numeral (I, ii, iii, etc.) they will not be renamed in a transposition, since it is assumed they will have the same function in the new key.
Notes
Or more precisely, pitches. These are the specific pitches that will be heard playing according to the "playpattern" assigned to this chord. These follow the same naming convention as for root names, except that they also must include the desired octave for each pitch, with no space before the octave number. Middle C is C4; octave numbers change at A, so the A below middle C is A4.
Playback volume
Most often you would just set the overall chord volume with the volume slider for chord symbols, but you can also change the volume of specific chords if you want to. As with note volumes, the volume of a specific chord is expressed as a percentage of the overall chord volume. If the overall chord volume is 78 and an individual chord is 100% of that it will also be heard at 78.
The Text Information Window
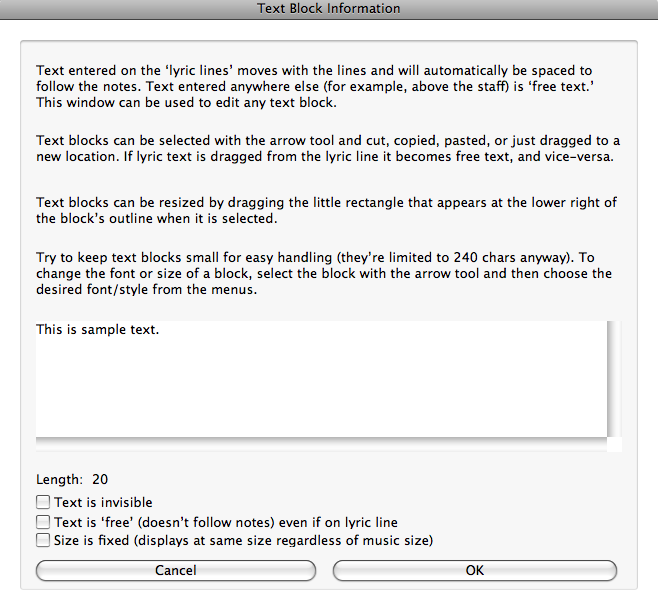
The first time you enter a block of text you can just place the text tool somewhere in the music and start typing. Once text has been entered you'll do any further editing in the Text information window. This window will appear when you either click on an existing text item with the text tool, or when you ask for the information window for a selected text item.
Editing box
You can edit text in this box in the usual way, by clicking in the box and typing. There is one limitation, which is that the number of letters or other characters in a single text block must not exceed 240. You can have as many text blocks as you want, but none can be longer than that. You'll find that 240 characters is plenty; that allows a manageable lyric couplet or an explanatory note without creating a block that is unwieldy within the music.
Text can be either "free" or "lyric," and is always associated with a particular staff - the one that was active when you entered the text. Drag a text block onto one of the green lyric lines that appear when text is selected, and its words and separated syllables will automatically move to follow the positions of notes in the associated staff. Drag it away from the lyric line and it again is "free" text that can go anywhere. Both lyric and free text will move with the associated staff if you drag the staff up or down by its handle. That way you don't have to reposition text every time you make an adjustment to staff positions.
Text is invisible
You may want to enter a note that isn't visible to readers. Because Practica Musica uses Songworks files this option is also used there for notes that appear in an example only after a student has done an exercise.
Text is free even if on lyric line
If a text block needs to be on a lyric line but is not intended to be treated as a lyric then check this box.
Text is fixed size
Normally the size of a text item's font will double when viewing in "Big Notes" mode, but you can choose to make it stay the same regardless. This doesn't affect printing, since printing is always done according to the print scaling chosen in the page setup, not according to the viewing size of the edit window.
 Note information