
Back to Table of Contents |
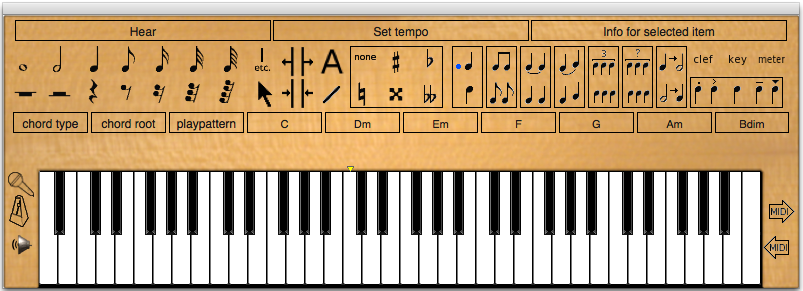
 Hear button
Set Tempo button
Info button
Note and rest choices
Barlines and miscellaneous symbols
Arrow tool
Spreader and Shrinker tools
Text tool
Slash tool
Accidentals tool
Stem direction tool
Beam/Unbeam tool
Tie/Untie tool
Slur/Unslur tool
Triplet/Untriplet tool
Tuplet/Untuplet tool
Double/Halve tool
Clef, Key and Meter choices
Articulation tools
Chord type, root, and playpattern choices
Chord choices
Microphone, metronome, and sound off/on
MIDI in and MIDI out
Hear button
Set Tempo button
Info button
Note and rest choices
Barlines and miscellaneous symbols
Arrow tool
Spreader and Shrinker tools
Text tool
Slash tool
Accidentals tool
Stem direction tool
Beam/Unbeam tool
Tie/Untie tool
Slur/Unslur tool
Triplet/Untriplet tool
Tuplet/Untuplet tool
Double/Halve tool
Clef, Key and Meter choices
Articulation tools
Chord type, root, and playpattern choices
Chord choices
Microphone, metronome, and sound off/on
MIDI in and MIDI out
 The edit window will look different depending on how many staves you've chosen and which clefs they are using, whether you have the chord symbol line visible, the lyric line handle visible, etc. But the tools you see below will always do the same things. If a control is draggable, you will drag it by clicking it with the arrow tool, holding down the mouse button, and moving the mouse.
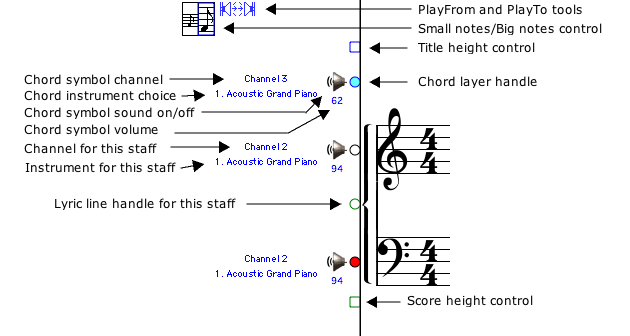
 PlayFrom and PlayTo tools
Click on one of these and then click in the music where you want to place it. If either or both of these is placed in the music, the Hear command will start at PlayFrom and stop at PlayTo. You can also drag either symbol with the arrow tool after placing it in the music. To put either of these back to its normal position (playing from the beginning and ending at the end), click the tool again and then click anywhere to the left of the staff.
Small note/Big notes controlClick this to toggle between big notes and small notes in the edit window. This is not the same thing as printing in small or big notes - that you can control with precision with the Print Scaling setting. This control only affects the size of music as it appears in the edit window.
Title height controlDrag this down with the arrow tool if you want more space for a title at the top of the first page. It will move all the staves and chords, etc. downward, and only on the first printed page.
Chord line handleYou can adjust the vertical position of chord symbols by dragging this up or down.
Chord symbol channelSounds play on any of the 16 channels available. Each channel can have a different instrument sound assigned to it, so any staves or chords that share the same channel will have the same instrument sound. The channel is changed in the same window that offers the instrument choices.
Chord instrument choiceClick on the instrument name to change it to any of the 128 instrument sounds available.
Chord symbol sound on/offThe chord symbols are normally audible, using your chosen playpatterns, but if you turn off the chord sound they'll be silent.
Chord symbol volumeClick on the volume number and a slider will pop up that you can use to adjust the chord volume. The range is 0 to 127.
Channel for this staffInstrument for this staffAs with the chord symbols, sounds play on any of the 16 channels available. Each channel can have a different instrument sound assigned to it, so any staves or chords that share the same channel will have the same instrument sound. Having 16 channels means you can use up to 16 different instruments at once. Channel 10 is customarily reserved for percussion sounds. The channel is changed in the same window that offers the instrument choices.
Sound on/off for this staffVolume setting for this staffEach staff can have a separate volume setting and its sound can be on or off independently of the others. Click the number under the speaker icon to change the staff's volume, which ranges from 0 to 127.
Lyric line handleYou can drag the lyric handle up or down to adjust the vertical position of lyrics. Keep in mind that every staff has its own lyric line handle and its own text "world" that moves when you move the staff up or down. You'll often want to move a lyric line handle to get the lyrics just where you want them. The lyric line can be dragged anywhere, even above the staff, but normally is below the staff to which it belongs. If a lyric handle has been dragged far from its staff, you can tell which staff it belongs to because when you click on the lyric handle its corresponding staff handle will fill in gray.
The keyboard window is your main source for music writing tools.
Hear button 
Click this to hear the current music, or whatever is between the PlayFrom and PlayTo markers. Ctrl-E (command-E on Macintosh) does the same thing.
Set Tempo button 
Click this to set the current tempo. Tempo changes within the music can be relative to this overall tempo. Ctrl-T (command-T on Macintosh) does the same thing.
Info for selected item(s) button 
Click this to see or change various things about selected items. The info window for each type of item is different; some have extensive extra options. Ctrl-i (command-i on Macintosh) does the same thing.
Note and rest tools 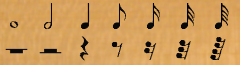
Click on one of these to choose a note or rest tool for entering notes or rests. Most of these have additional popups that allow you choose, for example, a dotted version of the symbol.
Barlines and miscellaneous symbols 
A popup will appear with a large list of symbols, including various types of barlines, dynamic indications, etc. Drag the mouse to the one you want, release to select the desired symbol, and then click in the music where you want it to appear.
Arrow tool 
The arrow tool is used for selecting items; this is the default "normal" cursor when you're not trying to enter anything. To choose the arrow tool, either click this or press the '/' key.
Spreader and Shrinker 
These are used for fine adjustments of note spacing - choose one and then click between the notes or rests you want to adjust. Each click adds or subtracts 1/72" (one pixel), though the adjustments made to keep symbols aligned and justified may keep that from being evident in some cases.
Text tool 
Choose the text tool to enter either free or lyric text. After choosing this tool, click in the music where you want to see text, and start typing. Text blocks can be dragged with the arrow tool after you create them. A single text block should not exceed 240 characters.
Slash tool 
The slash symbol represents a beat, but it's not quite the same as a rest. In a 'leadsheet' it means, 'keep playing accompaniment.' It has the value of one beat, whatever the meter is, and is just a placeholder for the accompaniment that is not written out. In the popup you'll also see a version of the slash mark that includes repeat dots: this is entirely different in meaning, it means "repeat the previous measure." These can be entered in the music like other symbols, but they are always positioned within the staff lines and are not draggable like non-rhythmic symbols.
Accidentals tool 
Accidentals are sharps or flats that appear within a measure, as opposed to those already contained in the key signature. If you choose one of these it will attach itself to the current note tool, if any, and enter when you click the note in the staff. You can also select a note that was already entered and then choose one of these. The sharp or flat will of course not be drawn if it's already in the key signature. It isn't necessary to use these if you're clicking a note directly in the staff and are not departing from the key signature. There are also keyboard shortcuts for choosing an accidental for a note cursor: the minus key and the plus key on the computer keyboard go in the flat or sharp direction. If you're not familiar with the "x" and the "bb" those are the double-sharp and the double-flat.
Stem direction tool 
The blue dot tells you which stem direction is the current default choice for new notes. You can use this button to change existing notes and to change the direction of the currently chosen note cursor. Ctrl-D (command-D on Macintosh) also toggles the stem direction.
Beam/unbeam tool 
The upper part of the button beams selected notes; the lower part unbeams them. Notes to be beamed must be in the same voice or track. Ctrl-B (command-B on Macintosh) also toggles beams on selected notes.
Tie/untie tool 
The upper part ties selected notes; the lower part unties them. Notes to be tied must be in the same voice or track and of course must have the same pitch. If you run into a note in your music that won't play, try untying it - it may be a "widow tie;" the second part of a note that was tied before but has lost its mate during editing. Ctrl-( (command-( on Macintosh) also toggles ties on selected notes. Ties can be adjusted by selecting the first note so that the "tie handle" appears, then dragging that up or down.
Slur/unslur tool 
The upper part slurs selected notes; the lower part unslurs them. Slurs can be adjusted by selecting the first note of the slur so that the "slur handles" appear, then dragging them. There's a handle at the beginning and end of the slur, and another at the middle. Ctrl-) (command-) on Macintosh) also toggles slurs on selected notes.
Triplet/untriplet tool 
The upper part triplets selected notes; the lower part untriplets them. Triplets can be adjusted by selecting the first note of the triplet so that the "triplet handles" appear, then dragging them. There's a handle at the beginning and end of the triplet bracket, and another allows you to drag the number. In the info window for the selected first note there's also another set of option you can choose, to set bracket direction, whether there is a bracket, etc. There is also a way to start entering triplets automatically without having to select group and modify them - choose this tool, then start entering notes. They will be formed into triplets when the total value is right.
Tuplet/untuplet tool 
This works exactly the same as the Triplet tool, but for other kinds of irregular groups (5, 7, etc.), which for lack of a better term we call "tuplets." You'll have a chance to choose the nature of the grouping when you select the tool.
Double/halve tool 
This doubles or halves the value of any selected notes. It's very handy for a group of notes being altered all at once.
Clef, key, and meter 
You can pick any clef, key signature, or meter sign from the popup boxes, and enter it in the music where ever you want. If you want to change an existing one, select it first, then choose the desired new symbol from one these popups (for example, changing an existing bass clef to a treble clef). Notice that music will automatically move on the staff when you change clef. It's not being transposed, it's just being redrawn as it should appear in that clef.
Articulation tools 
Select a note or notes and click one or more of these to alter its articulation. Choices from left to right are staccato, accent, normal, tenuto, and wedge.
Staccato = noticeably shorter than notated value.
Accent = moderately sharp attack, within context.
Tenuto = held to full value; also can refer to a pressure accent.
Wedge = very short. In modern practice also indicates martellato in string playing (heavy accent with the heel of the bow).
Tenuto + staccato = stressed and moderately short.
Tenuto + accent = percussive, but with full value.
Chord type, chord root, chord playpattern 
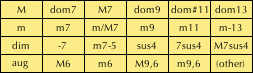

Select a chord or chords and click one of these to change its type, root, or play pattern. If the chord type you want isn't one of those included in the popup box of choices, you can make a chord of any type either by choosing the "other" chord type or by opening the information window for the selected chord - you can enter any pitches you like and give it a name of your own choosing. If you follow the naming conventions specified in the chord's information window your custom chord will even transpose correctly - name and all - when you transpose the score to a different key.
Chord choices 
The numbers printed below the tools indicate the scale degrees for the roots of each default chord, though actually you can change the default chord set to anything you like, in any order. Whatever you do, though, the number keys 1 through 7 (above the letter keys, not on the keypad) will still refer to the chord choice boxes in this order, and pressing a number key with no note tool selected will start playing the corresponding chord, using its currently chosen "playpattern" (accompaniment pattern).
To enter a chord in the music, you click one of the above boxes and that loads the cursor with the chord tool. Click in the music where you want the chord.
To change one of the default chords listed above, or a chord already entered in the music, first select the chord and then use the "chord type," "chord root," or "playpattern" buttons to modify the selected chord. For more customized chords you can use the "info for selected item" button to change the chord name and the pitches it contains.
Microphone, Metronome, and Sound off/on buttons |
 |
| off | on |
To use microphone input, connect a USB microphone to your computer and click the microphone icon to turn it on. It may be also necessary to visit your computer's sound settings, to enable the microphone input. When a note you sing or play is recognized Songworks will highlight the corresponding key on the piano and will also play the note back to you, if the keyboard sound is on. Be sure to have the computer's speakers quiet enough that they don't feed notes back into the microphone, or else you'll get an "loop" in which you sing a starting note, the computer recognizes it and plays it, then hears itself playing it, etc.
To use the metronome, click its icon to turn it on. When you use the "Hear" button you'll hear a metronome sound added to the mix,
There's rarely a reason to turn off the keyboard sound, except if the playback during microphone entry is not something you want.
MIDI out and MIDI in buttons |
 |
| off | on |
If you want to connect a MIDI keyboard for input, connect the keyboard with its USB cable and then click the inward-pointing MIDI button, the lower one that points to the piano keys.
If you want to use a MIDI device for sound output, connect it via its USB cable and click the outward-pointing MIDI button. You can use MIDI input in combination with the computer's own sounds (useful if your MIDI device is a "controller" that doesn't make its own sounds) or you can use both MIDI input and MIDI output.
If yours is a Windows computer you will probably want to use a MIDI device that makes its own sounds, since the built-in sound synthesizer on most Windows computers is too slow for effective use when recording music in "real time."
Back to Table of Contents |