
Back to Table of Contents |
 Hear (all, or what is between the < and >)Hear with Active Listening (tap a part)Set tempo
Transpose entire scoreTranspose chords onlyAutobar entire score now (add barlines automatically)Autobeam entire score now (beam notes as appropriate)Autostem entire score now (set stem directions automatically)Autointerpret accidentals of entire score (may change notation but not sound)Suggest chords to go with this musicConvert chord symbols to piano accompaniment
Take a high-resolution picture
Set note spacing...Set default grace note behavior...Set measure numbering...Set connections between staves...
Justify (to print even on right)Automatically enter barlines during note entryHide line breaks in editing windowNumber pagesSet or clear a password locking this score
Hear (all, or what is between the < and >)Hear with Active Listening (tap a part)Set tempo
Transpose entire scoreTranspose chords onlyAutobar entire score now (add barlines automatically)Autobeam entire score now (beam notes as appropriate)Autostem entire score now (set stem directions automatically)Autointerpret accidentals of entire score (may change notation but not sound)Suggest chords to go with this musicConvert chord symbols to piano accompaniment
Take a high-resolution picture
Set note spacing...Set default grace note behavior...Set measure numbering...Set connections between staves...
Justify (to print even on right)Automatically enter barlines during note entryHide line breaks in editing windowNumber pagesSet or clear a password locking this score
 Commands in the score menu refer to the entire score - some of these commands have equivalents in the Staff Menu that apply only to the active staff.
 Hear (all, or what is between the < and >)
Does the same thing as the Hear button, or the keyboard shortcut ctrl-E (cmd-E on Macs). If desired, you can isolate part of the music using the PlayFrom and PlayTo markers in the upper left of the edit window. To use these, click one of them and then click in the music to place it. To set it back to the beginning again, choose the tool once more and click anywhere to the left of the music. These tools can also be dragged within the music with the arrow tool after you've placed them.

Hear with Active Listening (tap a part)Active Listening is unique to Ars Nova products. It can be used to learn your own part in a multivoice piece, or just for fun. It will work with a song with chord symbols or with a multistaff composition. Let's suppose you have a four part chorale and you are trying to learn the tenor part. Click anything in that staff to make the tenor part's staff the active staff. Choose Hear with Active Listening, and you'll be invited to tap the rhythm of your part, using any pair of letter keys from the middle row of keys. As you tap the rhythm of your part the correct pitches will sound, and the other parts will also follow along so that you can hear how your part works with the others. If you stop, the others will also stop at the first good stopping place (where they're all together). If you jump ahead by playing quickly, they'll jump ahead also. You can also choose to hear your part together with just one or two of the others by turning off the sound on one or more of the other staves.
Set tempoSets the overall tempo. You can still make tempo changes within the piece by placing tempo change symbols where needed. The tempo change symbol is shown below, and can be found in the miscellaneous symbols popup just to the left of the arrow tool.

Transpose entire scoreA similar command is in the Staff menu for use on individual staves - these commands in the Score menu apply to the entire piece. You'll be asked to choose either a new starting note for the active staff, or a new key from theKey choice tool.
Transpose chords only Applies only to chord symbols. You'll be asked to choose either a new key or a new root for the first chord. All chord symbols will be adjusted accordingly, both their names and the notes they contain.
Autobar entire score (add barlines automatically) Puts in barlines as needed, and breaks into tied pairs any notes that would cross a barline. This is not always mathematically possible! If you've accidentally put in a really odd combination of note values you may end up with a long series of tied 32nd-notes, etc. If so, Undo, fix the error, and try again. If you really want a non standard measure here and there, enter the barlines manually.
Autobar assumes that the first beat is the first beat of a measure. If you intend for the first note or notes to be "pickup" notes of an incomplete measure, you should manually enter the first barline where you want it. That will tell Songworks where the first full measure should begin, and it will calculate the rest on its own.
Autobeam entire score (add barlines automatically)Beams together any notes that can be beamed (eighth notes and less). Beaming is done by beat, to keep the beat structure clear. If you have a series of eighth notes in 4/4 times, for example, they will be beamed two at a time. For more elaborate beaming patterns, do it manually with the beam/unbeam buttons.
Autostem entire score (set stem directions automatically)Sets the stem directions so that higher notes have their stems down, and lower ones have their stems up. In the case of a beam group, all the notes of the beam group will follow the direction of the first note. You can manually change that if you desire, using the stem direction tool and the beam tool.
Autointerpret accidentals of entire score (may change notation but not sound)The keys of the piano can have different names, though a key plays the same note in each case. However, the musical difference between, say, D# and Eb is actually very important. It affects the understanding of the harmony and on certain instruments even can affect the pitch. If you have imported a MIDI file (MIDI files make no distinction between D# and Eb) or otherwise have entered a melody whose spelling is a mystery to you, this command will attempt to put things right. However, getting it really right for sure may require some music lessons. Fortunately, most popular melodies confine themselves to the notes of a single scale and if you have the correct key signature this issue will not pop up.
Suggest chords to go with this musicThis command is also found in the Ideas menu. Suggests chord symbols that Songworks thinks might work with your music - you can use them as a starting point for your own harmony. You can adjust the types of chords to include with the "View options for generated chord progressions" command in the Ideas menu.
Convert chord symbols to piano accompanimentThis will convert the current chord symbols to piano accompaniment placed below your composition. The piano part will use the accompaniment patterns you've chosen for your chords - remember that you can use one playpattern for all the chords, or change them hear and there for selected chords, if desired.
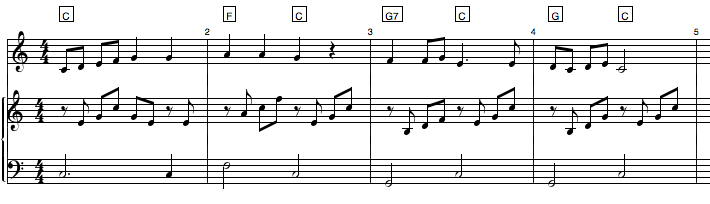
Here is a melody with chord symbols:

Here is the same music after using the convert chords command, using our choice of accompaniment pattern (playpattern). You can of course make changes to the accompaniment:
Take a high-resolution pictureThis is very convenient if you are preparing music examples for publication in an article or a lesson sheet, etc. You can drag a selection rectangle to outline the part of the music you want "photographed," and you'll get an image that is print-quality (can be printed smoothly at any size, unlike a "screen shot.") On the Macintosh these images export as "PDF" files, which are universal images useable on any contemporary computer (some Win computers may require a free download of the Adobe Acrobat Reader software). On Windows computers the exported format is Microsoft's own "Enhanced Metafile," which is supported by programs such as Microsoft Word.
Set note spacing...Set the number of screen pixels (about 1/72")used by a quarter note. The default setting
is 35, which looks good for most music, but you may want to tighten that up if you need to squeeze more music onto a page. Changing this number to 25 will make quite a difference. We recommend that note spacing should be your first choice for adjusting the spacing of music. After you have this setting as you like it, you can make further small adjustments by dragging barlines to squeeze or expand a measure, or by using the Spreader/Shrinker tools to add or remove space between notes or rests.
Set default grace note behavior...If you're entering a lot of grace notes you might want to chose what kind they are in advance, so you don't have to make those additional choices when entering the notes.
Set measure numbering...Gives you several choices for numbering style, including having no numbers.
Set connections between staves...Choose a bracket or brace at the left and choose whether interior barlines of the currently active staff are to extend to the next staff down (usual choice is "yes"). You can also change the extension of individual bar lines in the information window for a selected barline.
Justify (to print even on right)You'll always want this on when printing, but we suggest that you
turn it off when editing music, because editing is easier without it. With justification on, you'll find that sometimes when you make an editing change the notes will all move a little as they adjust themselves to come out even at the right side of a page. It's like working with a justified word processor; sometimes a word will be bumped down to the next line and the others in that line will spread out. With justification off you'll know exactly what the minimum space is, for example, between two notes that carry lyrics. Justification may add to that space but it will never subtract from it.
Automatically enter barlines during note entrySome people like having barlines show up automatically once a measure is "full." But this won't stop you from manually entering barlines.
Hide line breaks in editing windowUsually you don't need to see these, but line breaks and page breaks can appear in the editing window if you want them to. A line break is a dotted V at the top of the staff, and a page break is a dotted double V. A "hard" line break you've set in the info window of a bar line is a solid V, and a "hard" page break similarly is a solid double V.
Number pagesIf checked, printed pages will be numbered at the bottom center, after the first page.
Set or clear a password locking this score.Sets an optional password if you want to prevent editing of a music file. The same command is also available in the File menu.
Back to Table of Contents |